The first lessons cover the essentials of good photography, which are: Get closer to your subject. Use the largest JPEG file size your camera will give you. Follow the Rule of Thirds.
Beginning with this one, all of the remaining lessons are beneficial, but they don't apply in nearly all cases the way the first ones do. Here is Lesson 3:
Diagonals
The world is full of straight lines. We see them all the time, to the point that they're ordinary. Photographing straight lines in their straightness can be good, but most of the time it's just boring.
Diagonals, on the other hand, are more interesting. You can find diagonals that already exist and photograph them, like the East Quoddy lighthouse in New Brunswick, Canada.

Or you can take straight lines and rather than go with your first instinct to photograph them horizontally (or vertically), like this:

... you can turn the camera (or yourself) to make the lines diagonal:

This isn't a great picture, even in the second version, and I still haven't decided which one I like better, but I offer it here as an example of how easy it can be to put diagonals in your photos.
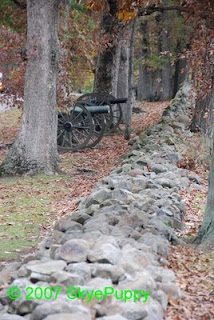
When you're out in the world taking pictures, be aware of which way the lines are going across the viewfinder. In this picture at Gettysburg, it only took a couple steps to the right to change the rock barrier from a vertical line up the side of my photo to a more pleasing diagonal that helps lead the eye to the cannons.

My first instinct in this New York deli would have been to take the picture by looking straight at the sandwiches. But that would have placed the lines of the counter, shelving, and even the sandwiches, horizontally. By moving to the side and shooting along the display case, it made the lines diagonal (and prevented me from photographing the flash of my camera in the glass).

For close-ups with straight lines, diagonals tend to look better. This is the early-morning frost on my car, and I can't imagine the picture working this well if I took it horizontally or vertically (click to enlarge).

One more tip: Parallel lines that converge in the distance, like railroad tracks or the sides of the road, show up in photograph as diagonal lines. These often make good photos.
Homework:
Practice photographing diagonals. Find them where they exist. Make them by changing the camera angle. If you like some of your shots and want to share, post them on your blog and leave a comment here with the link.
Previous Lessons:
Photography 101 - Lesson 1 and Homework
Digital Photography 101 - Quickie Version
Digital Photography 101 - Update
Photography 101 - Lesson 2
3 comments:
hey!! this is great can I join? I will get some shots and post them and put a link here.
I just wanted you to know that when I took my valentines day pictures with my kiddos last week, I was pondering lesson 2. Pretty sure I failed it - but I did ponder it while taking!!!
I'm enjoying your photo lessons even though I'm not currently taking any pics. I need to recharge my battery first...and I'm procrastinating!
But never fear...when life settles down a bit, I will be posting pics.
Post a Comment